Tuesday, September 14, 2010

Ready Steady Cook: Part Three, The Dessert

readysteadycook


Even the best meals are incomplete without something sweet to round them off. I can't seem to finish all three courses at any restaurant, so I've adopted the mains-and-dessert ordering method. It has served me very well and allowed me to enjoy every last bit of my dessert, while others struggle through theirs.

This dish comprises the things i love most in a dessert; dark chocolate, custard, poached fruit and, of course, pastry. Thank you, Tara, Hila, Yuppiechef, EatIn, Pepenero and Ruth Prowse for giving me the opportunity to make yummy chocolaty things! It's really been great being part of the competition. I might even consider maintaining more than just my Tumblr blog...

Sweet Dough Tartlets with Chocolate Orange Crème Pâtissière and Lemon-poached Litchis


For the tartlets (Pâte Sucrée)  (This recipe is adapted from another excellent recipe by Michel Roux)
250g flour, sifted
100g butter, cubed and slightly softened
100g icing sugar, sifted
a pinch of salt
2 large free-range eggs, at room temperature

Method:


  1. Working on a cold surface and out of sunlight, mix the icing sugar, salt and flour together with your fingers and gently rub in the butter with your fingertips until the dough resembles even, grainy crumbs.
  2. Bring the crumbs together to form a mound and make a well in the centre.
  3. Place the eggs in the well and work them into the mixture with your fingertips, until the dough starts to come together.
  4. Once it is uniform in texture, knead the dough with your hands a few times until it is smooth.
  5. Flatten slightly and cover with plastic wrap, then refrigerate for 1-2 hours before using. If you are really rushed, you can put it in the freezer to firm up the butter faster, but transfer it to the fridge before use, because rock-hard dough is just as useless as melting, soft dough.
  6. While the dough is in the fridge, make the chocolate orange creme patissiere


For the Chocolate Orange Crème Pâtissière

Peeled zest of two oranges
500ml milk
6 large free range egg yolks
125g castor sugar
40g flour
100g dark chocolate, chopped

Method:

  1. Heat the milk and orange zest in a small saucepan over a medium heat.
  2. While the milk is being heated, whisk the egg yolks and sugar in a bowl with a small balloon whisk, then add the flour and whisk until smooth, making sure that there are no lumps or bits of sugar stuck to the bowl.
  3. As soon as the milk starts to boil, pour 1/3 of it through a sieve (to catch the zest) into the egg mixture and whisk thoroughly.
  4. Slowly add the rest of the boiling milk, (still catching all the zest with a sieve) and whisk until smooth.
  5. Pour the mixture back into the pot and return to the heat, stirring continuously with the whisk, making sure it stays in contact with the bottom of the pot.
  6. Once the mixture starts to boil, whisk until it becomes thick like pudding. This shouldn't take too long over a medium heat.
  7. Remove from the heat and add the chopped chocolate, continuing to whisk until the custard is an even, dark brown colour and the chocolate is completely melted and incorporated.
  8. Strain custard though a fine-mesh strainer into a large shallow container. The larger the surface area, the quicker the custard will set. Cover with plastic wrap that touches the surface of the custard to prevent a skin from forming and remember  to allow the hot air to escape by leaving a small corner uncovered by plastic.
  9. Refrigerate until cold and firm.


Baking the tartlets:


  1. Preheat the oven to 170°C
  2. Roll the dough out on a flour-dusted work surface to about 3mm thick
  3. Using a cutter, cut out a circle of dough about 2cm wider than your tartlet pan
  4. Press the dough into the tartlet pan, making sure the dough makes contact with the full surface of the pan. If it is a fluted pan, use your finger to press the dough into every flute on the side.
  5. If necessary, trim the excess dough from the sides of the pan with a very sharp knife, angled slightly upwards, rather than down into the tart.
  6. Pierce the tartlet several times with a fork and refrigerate again to rest the dough.
  7. Line the tart with baking paper and fill with baking beans
  8. Blind bake the tart for 10 minutes with the beans, then another 5 minutes without the beans.
  9. Once they are evenly coloured, remove the pans from the oven and allow to cool slightly before removing the tartlet cases from the pans , then transfer to a wire rack to cool completely.


The tartlets can be filled once completely cooled, or you can store them for a few days in an airtight container. If they become soft, you can reheat them in the oven for a few minutes.


For the lemon-poached litchis

About 240g fresh or canned litchis (fresh is better)
2 TBS castor sugar
1 TBS of water
1tsp grated lemon zest
2 TBS lemon juice


Method:

  1. Combine sugar, water, lemon zest and juice in a medium-sized saucepan over a moderate heat, stirring constantly until sugar is dissolved.
  2. Once sugar is dissolved, add the litchis to the pan, reduce the heat and simmer, covered for 10 minutes. The litchis will retain their retain their shape, but will be noticeably softer.
  3. Before serving, drain the litchis from the poaching liquid and use the lemony liquid to decorate your plate.
Finishing the tartlets

Using a palette knife or a piping bag with a plain nozzle, fill the tartlet with the crème pâtissière and smooth off the top.

Decorate with orange segments or candied orange peel and serve with the syrupy, sweet litchis.


Ready Steady Cook: Part Two, The Main Course

readysteadycook


The challenge continues...


I managed to survive the first course of my 3-course meal for the Ready Steady Cook challenge. So far, it's been so much fun coming up with ideas for my little menu. The only struggle has been the lack of onion in my options list and the fact that i have only two vegetable-type ingredients; mushrooms and tomatoes. But, not being one to give up easily, i am happy to find interesting variations on trusted themes, and also to create some themes of my own.


The main course definitely requires a dark green salad with a decent helping of peppery rocket. It's super rich and creamy and a burst of fresh, crispy greens would balance it perfectly. If you read my starter post, you'll be happy to know that this is a far less complicated recipe.

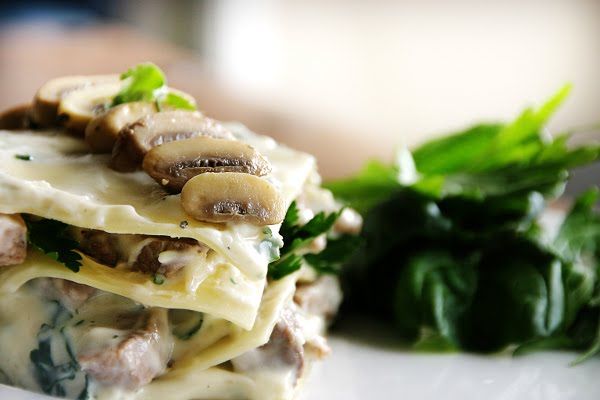
Luxurious Free-Form Lasagna with Minute Steak, Mushrooms and Creamy Garlic Bechamel


The Italian theme has made its way into the second course, too. I was going to make a full baked lasagna, but this turned out to be the better, and easier, option, especially due to my limited ingredients. It was so good, though! I'm pretty sure it disappeared as soon as it had been photographed!

What you'll need, per person:

4 Lasagna sheets
about 3 Minute Steaks, depending on their size
a handful of button mushrooms, sliced
olive oil, just a little
dried chilli flakes
salt and pepper

Garlic Bechamel Sauce (for two) (adapted from an excellent recipe by Michel Roux)

2 small cloves of garlic, crushed
1/4 cup flour
2 cups milk
salt and freshl;y ground black pepper
a handful of fresh flat-leaf parsley, chopped

Method
  1. Cut the minute steaks into strips about 1cm wide, season with chilli flakes, salt and pepper. Toss in a bowl with some of the olive oil, cover and set aside to marinate.
  2. Bring a pot of well-salted and oiled water to the boil and cook the lasagna sheets individually, being sure to keep them from sticking together. 
  3. While they cook, make the bechamel sauce:
    1. Melt the butter in a small, heavy saucepan over a low to medium heat, then add the garlic and stir until the butter is flavoured
    2. Add the flour and cook for two minutes, stirring constantly with a small balloon whisk. If it seems to be cooking too fast, turn the heat down a little
    3. Pour the milk into the flour mix (roux) little by little, whisking continuously to ensure a smooth sauce, slowly bringing the sauce to a boil.
    4. As soon as you see that the sauce is boiling, don't stop whisking, but turn down the heat and let the sauce simmer for about 5 minutes.
    5. Remove from heat, season to taste and stir in the fresh parsley.
    6. Strain through a sieve into a dish and cover with plastic film to prevent a skin forming.
  4. Heat your frying pan to a medium to high heat and add some of the oil from the marinade to your pan.
  5. Lightly fry the mushrooms in the pan until they are well coloured and flavoured.
  6. Turn the heat up and toss the minute steak strips into the pan. They should have enough oil on them from the marinade, so don't add any more. 
  7. Cook them to flavour and seal them, but as soon as they have browned, remove them from the pan. They become tough very quickly, so you'll want to avoid over-cooking.
  8. Ok, now put it all together:
    1. Keep aside some some mushrooms and bechamel for the topping.
    2. Combine the steak and mushrooms with the bechamel sauce, making sure you coat everything with the saucy goodness.
    3. Drain and pat the individual lasagna sheets dry and place one on each plate
    4. Generously spoon some of the mixture onto the sheet and top with a layer of lasagna. You should be able to have three layers of filling and a top layer of lasagna.
    5. Using a small knife or a spatula, spread a thin layer of the reserved bechamel sauce onto the top layer and top with the left-over mushrooms. 
    6. Garnish with sprigs of the flat-leaf parsley and serve immediately.


Ready Steady Cook: Part One, The Starter

readysteadycook


As i mentioned here, I'm taking part in the Ready Steady Cook challenge, hosted by Hila at Add to Taste. What I didn't mention is that i can only use 7 ingredients to make a full three-course meal. Obviously, that's what makes it a challenge, but I didn't realise just how much of a challenge it would be, until i got down to the cooking part.

My ingredients list went something like this:

  • Litchis
  • Oranges
  • Dark Chocolate
  • Button Mushrooms
  • Lasagna Sheets
  • Minute Steaks
  • Couscous


Luckily, the ingredients list i got from Tara was pretty straight forward. There was enough of everything and plenty starch to fill the gaps. And, being a little obsessed with pastry, i couldn't stop myself from finding reasons to make doughs for every course. Luckily, lasagna sheets were on the ingredients list, so i could buy them after i somehow made pasta dough that was too crumbly. That hasn't stopped me, though. i'll be making pasta again soon and hopefully, next time i'll get it right.

So here they are:

Deceptively Italian Mushroom Wontons with a
 Basilly Napolitana-esque Sauce


Ok, So i'm a bit obsessed with dim sum at the moment. I have so much rice paper in my cupboard that i have a whole section for it. Round rice paper, square rice paper, big, small, you name it. No rice paper has gone unbought once discovered. But what i didn't have, until now, was proper Wonton wrappers. Enter Ready Steady Cook, a reason to make pretty little things and show them to the world. well, the blogosphere.


It was really the lasagna (and the tinned tomatoes) that inspired the Italian theme. The fusion idea? I'm pretty sure it arose from my constant wish to go to Haiku, my favourite Asian tapas place. Even as I'm leaving Haiku, completely sated, i find myself wondering if i should have had that other potsticker or just one more har gau.

In order to make these delicious wontons, you'll need the recipe below, which requires me to stop fantasizing about Haiku, and actually getting down to business. Ahem. Here goes:

For the Wonton Wrappers (about 24 of them):

1 egg
1 tsp salt
2 cups flour, sifted into a large mixing bowl
1/3 - 1/2 cup water, as needed
extra flour for dusting the work surface
a small amount of oil for the bowl and for brushing the wontons before baking

Method


  1. Lightly beat the egg and salt, then add 1/4 cup of water and whisk until incorporated.
  2. Make a well in the flour and pour into it the egg and water mixture.
  3. Incorporate the flour into the egg mixture, working from the centre outwards, until all the liquid is mixed with the flour. Add as much water as is required to form a dough. This will depend on the moisture content of the flour you're using.
  4. Form the dough into a ball and knead for 5 minutes on  work surface until a smooth, workable dough is formed.
  5. Put dough in a very lightly oiled bowl, cover with a tea towel or plastic wrap and rest for 30 mins
  6. Turn the dough out onto a lightly floured surface and roll out as thin as you can, only a few millimeters thick. It might be easier to divide the dough and roll it out in batches. If you struggle with rolling evenly, Joseph Joseph makes this wonderful Adjustable Rolling Pin, which makes sure  dough is rolled evenly and to the required thickness.
  7. Using a ruler and a sharp knife, measure and cut 9x9cm squares. Keep the dough covered with some plastic wrap to prevent dehydration.


These little wrappers can be frozen or refrigerated for future use. I like to separate them with sheets of baking paper to prevent sticking when thawing.


For the Wonton Filling


1 cup couscous, prepared according to package instructions, kept warm
15ml olive oil
250g button mushrooms, quartered
2 cloves of garlic, crushed or sliced
a decent blob of butter
about a tablespoon of dried Oregano and Rosemary
a small handful of fresh basil leaves, torn.

Method


  1. Preheat the oven to 180 degrees celcius.
  2. Toss the fresh basil into the warm couscous and allow it to infuse and wilt slightly
  3. Heat the olive oil and butter in a frying pan over a medium heat
  4. Sauté the garlic, but keep the heat low enough for the garlic to infuse in the oil without colouring.
  5. Add the dry herbs, then the mushrooms, and toss them in the oil to coat. Cook them until they are well coloured, but not shrunken. If you are worried about losing moisture, you can put a lid on the pan while the mushrooms cook.


So now you have basil-infused couscous and herby, garlicky mushrooms. The best thing to do now is to remove the mushroom pan from the heat and to stir the couscous into the mushrooms until the ratio of the two seems right to you.

Prepare the wonton wrappers by laying them out on a surface and brushing the edges with a little bit of water. Place a spoonful of the mixture onto the centre of each wrapper and fold the wonton by bringing opposite corners together at the centre. Brush the outside lightly with oil and bake for about 10-12 minutes, or until golden brown. You might need to rotate the pan for even colouring.

While they bake, you can quickly make the tomato dipping sauce. The sauce is very important, because it'll be the main flavour separating the starter from the main course. Being limited to basically two vegetables, my dishes are similar, but I've made special effort to keep the textures and flavours different.

The sauce recipe is adapted from Jamie Oliver's Quickest Tomato Sauce

For the Basilly Napoletana-esque Sauce

30ml good quality olive oil
2 cloves garlic, sliced
a bunch of fresh basil leaves, torn into shreds
1x 400ml tin of whole tomatoes (i tried with the chopped ones, but they seemed too watery)
Salt and black pepper to taste

Method

  1. Heat the olive oil in a large frying pan
  2. Add the garlic and toss it around the pan until it starts to colour
  3. Add the basil and tomatoes, squisshing the tomatoes with a wooden spoon, season with salt and pepper and bring to the boil
  4. As soon as it starts boiling evenly on all parts of the pan, remove from the heat and strain in into a bowl through a sieve
  5. Push as much of the tomato pulp through the sieve as you can, but dont't worry about the basil and garlic bits; they have already done their job.
  6. Once all the sauce is strained, put it back in the saucepan, bring back to the boil and simmer for 5 minutes, until it is saucy enough to be a dip, or to spread on pizza.
Freeze or refrigerate whatever you don't use and you'll have a perfect mid-week pasta sauce!


Ready Steady Cook: Now on blogspot!

readysteadycook


So I finally convinced myself to sit down and write out all my recipes for the Ready Steady Cook challenge, hosted by Hila at Add to Taste. It's not that i don't want to type out my recipes, it's that i had some severe issues uploading the post to my Tumblr page, which resulted in everything being badly formatted and later, lost.

I'd pretty much given up, until yesterday, when i realised that it's too close to the closing date to give up. I'd already put so much love into my little dishes and i couldn't bear the thought of it all being for nothing. Also, i must admit that the prizes are more than enough to inspire action! Somehow, Hila has managed to get Yuppiechef, EatIn Magazine, Pepenero Restaurant AND Ruth Prowse on board. Need i say more?

So I'm finally doing it. And hopefully someone will like my food enough to acknowledge it. I don't need prizes, just followers. Especially since this is my first blogspot post and i probably need a readership to be noticed!

The menu to follow: Deceptively Italian Mushroom Wontons with a Basilly Napolitana-esque SauceLuxurious Free-Form Lasagna with Garlic Bechamel, and Sweet Dough Tartlets with Chocolate Orange Creme Patissiere.